Friday, October 14, 2016

Reviving a Lookup field in a published 'read-only' Content Type

A Lookup field as part of a Content Type in the Content Type Hub that is published will not appear in the other Site Collections because it's missing the link to the connected List.
But it's possible to revive this Lookup field in the published 'read-only' Content Type that's added to a List or Document library.

First add a list in the Content Type Hub and add an extra Column named 'Description' to it:


Create a Site Column of the type Lookup and connect it to the List:


Create a new Content Type based on Document:


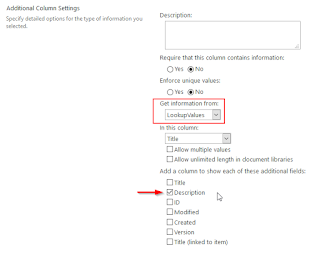
Add the Lookup field to the Content Type:


Publish the Content Type:


The Content Type is now available in the other Site Collections.


But there is no Lookup field in the published 'read-only' Content Type.


Create a similar List and Lookup field with the same name in this or other Site Collection:


Add some items to the List:


Create a Site Column of the type Lookup with the same name (and typo) and connect it to the List:

Go to a Document library and set 'Allow management of content types' to Yes in the Advanced Settings, add the published Content Type to the Library and Set as default Content Type:

Add a new document to the Library; there is no Lookup field (yet):


Now 'Add from existing site columns' the local Lookup field:


It looks like the Site Column is not added to the read-only Content Type.


And here is the magic. The Lookup field is revived and is connected to the local List.


Friday, October 7, 2016

Drag and drop files between groups to update metadata in modern document libraries

There is a storm of changes and new features unleashed in Office 365 and it takes effort to keep track of it all ('Luctor et Emergo'). But something caught my eye when I read the What’s new in Microsoft SharePoint Online June 2016 Updates. A small note in the text, but one giant leap for users: Drag and drop files between groups to update details when you're in a view that groups files by metadata.

Adding metadata automatically is easy when document properties are promoted from the Office file to columns in SharePoint and/or default values are set for metadata at library and folder level. But once the document is there, it's always been a challenge to let users update the metadata for sake of document management and control.
Modern document libraries offer the possibility to edit the columns directly in the information panel and modern display form. Drag and drop could be the most userfriendly way to let you update the metadata so let's find out how (and if) this works.

I've created a number of "Group By" views in a document library:


Group by Choice field: it works!

Drag & drop the selected document(s) into the other group:
The update of the Choice field value is successful:
Group by Lookup field: error! this is fixed by the product team


The item wasn't updated; the following error occurs:


Group by Person field: it works!

Drag & drop of tiles does also work


Group by Managed metadata field: nothing happens! This is fixed by the product team as well !


I've submitted a service request in my tenant to find out more about the current shortcomings.
I'll keep you posted about the updates.

Update 28-11-2016: The error with (Group by) Lookup field is fixed by the product team; this works correct now. A new ticket for a hotfix is opened for the (Group by) Managed metadata field.

Update 20-01-2017: Drag & Drop to change the value of a managed metadata field is working now.

Wednesday, May 4, 2016

Go with Flow: Create your own timer jobs to schedule workflows in SharePoint Online!

The Expiration / Retention Policy, part of the Information management policy settings, can be useful to start a workflow on items / documents at an expiration date, based on a logic retention period. This is a robust mechanisme based on a timer job that will process a queue. In this way archiving or other scheduled processing can be started for even large amounts of items / documents "at once".
In SharePoint Online the retention timer job is fired only once a week and only 2010 workflows can be started through this mechanisme. But with the new (in preview) service Flow it's possible to create your own timer jobs to schedule 2013 workflows on lists / libraries in SharePoint Online.

Start a logic flow from scratch and select the Recurrence option to start from (as the trigger).

 
Select a frequency (unit of time) and an interval, for example every 1 Day.


Choose as action 'SharePoint Online - Create item' in a list at a specific site url.
Add a workflow to this list that will automatically start when a new item is created. From this workflow the processing of items in another list can be initiated.
Here is some inspiration to get this dirty job done:

Go with Flow: Email enabled document libraries are back in SharePoint Online!

With the new* in preview service Flow -as part of Office 365- it's possible to add email attachments to a document library in SharePoint Online, where as the standard option is not available.
This is an useful way to process files by saving them in a document library and thereby triggering a workflow for further processing.


 There's a template available to start from. First the permission to the connections must be set.


Then the logic flow itself is configured. Extra conditions can/should be added to the trigger 'On new email' to be sure that only relevant content is saved to the document library that is listed in the Folder Path.


Give the flow a name and hit the button 'Create Flow' to publish and activate it.
Now the flow is active. Take it for a test drive and send an email with attachment to the inbox.


Under My Flows there's a dashboard with a list of your flows. Click for information to show the list runs.


You can check the status of every run and zoom into it. Click on the step for more detailed info about it.


After a succesful run the email attachments were saved to the document library in SharePoint Online.


The flow could be extended with another action to set the Title field of the file via the REST API using a Http request.


* Microsoft Flow is availabe in preview and is a development that originated from Azure Logic Apps and was/is part of the (former invite-only) preview of PowerApps. With Flow it's possible to create automated workflows between different services to get notifications, synchronize files, collect data, etc. in a way of If This Than That by configuring a combination of trigger, conditions and actions.